
How-to guide · SDK
How to add Truvyx evaluation to an AI agent
The SDK is the bridge between the agent you already run and the evaluation system that tells you whether it is safe, complete, and useful. This guide starts from zero: install the package, run one evaluation, understand the result, then make it part of your release process.
Before you write code
You need three things: an existing agent function, a Truvyx scenario ID, and an API key from your organisation settings. A scenario is the test situation your agent must handle; it comes from Scenario Studio. The SDK does not replace your agent or require a new orchestration framework. It calls your function, submits the output, and returns the evaluation.
Keep the API key server-side. Put it in an environment variable such as TRUVYX_API_KEY; never paste it into a browser bundle, a public repository, or a screenshot.
Step 1: open SDK Docs and choose your path
Open SDK Docs from the dashboard. The page is organised as tabs. Start with Quick Start; return to API Reference when you need field definitions, then use Contract Tests and CI/CD as you move toward production.
Step 2: install the package
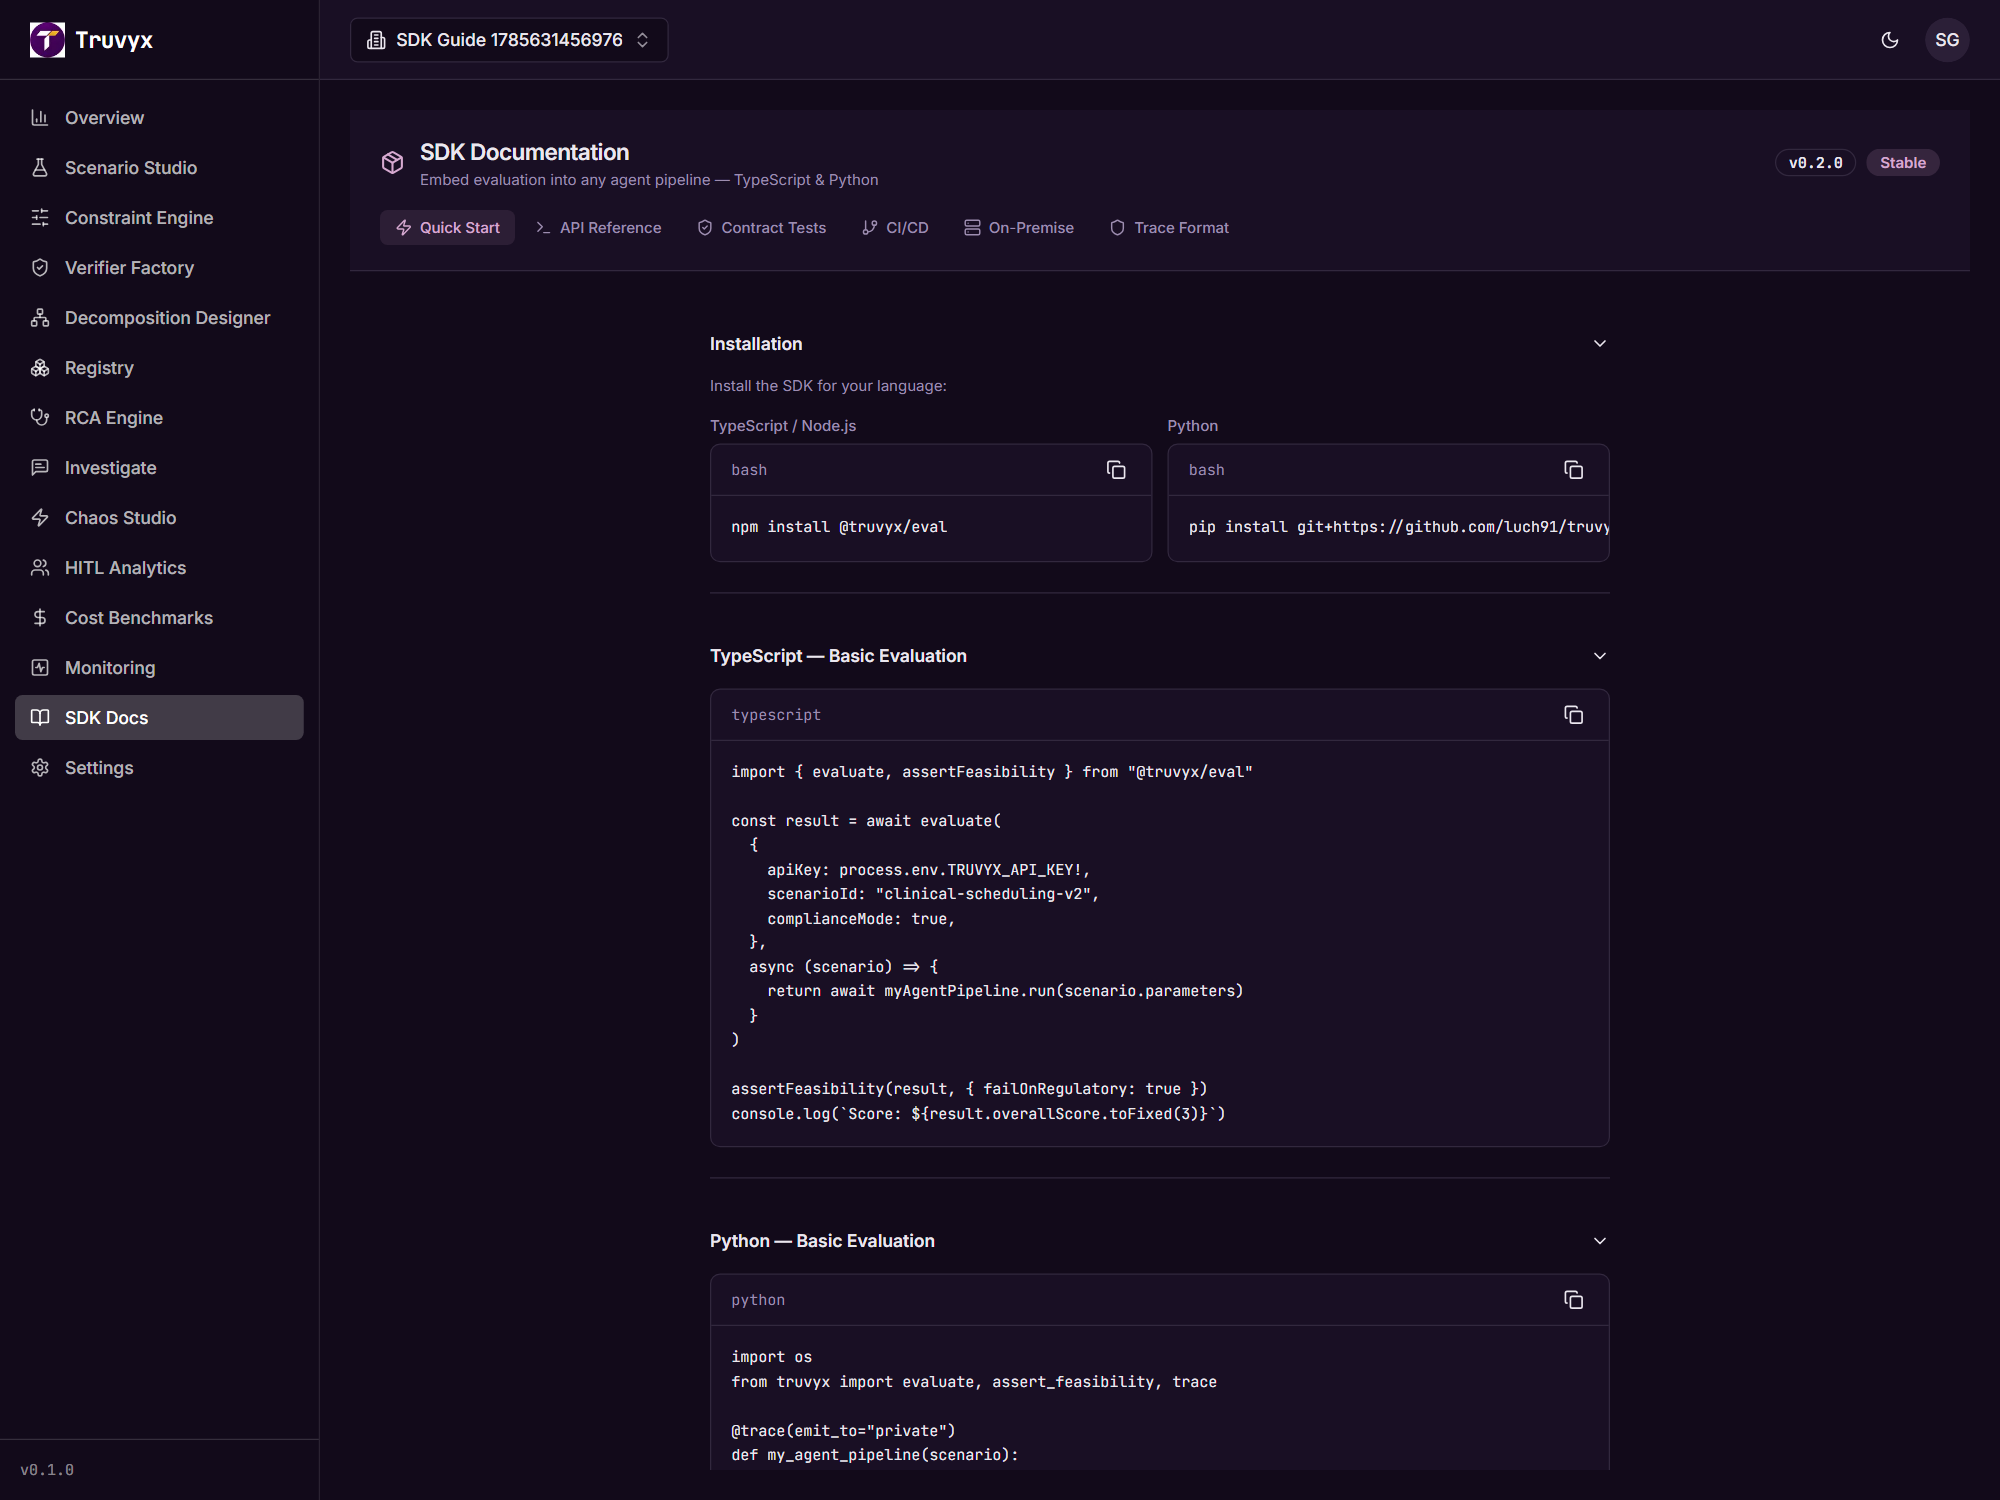
Choose the language your agent already uses. The TypeScript package is @truvyx/eval. The Python example installs directly from the repository path currently documented by the product, so verify the package source and version in your own deployment before pinning it in a lockfile.
TypeScript / Node.js
npm install @truvyx/evalPython
pip install git+https://github.com/luch91/truvyx.git#subdirectory=packages/sdk/pythonFor a first test, install in a small branch or virtual environment. Confirm that your runtime can read TRUVYX_API_KEY before connecting a production pipeline.
Step 3: run your first TypeScript evaluation
The callback is your existing agent pipeline. Truvyx passes scenario parameters into it; your function returns the agent output. The scenario ID must identify a scenario your organisation can access.
import { evaluate, assertFeasibility } from "@truvyx/eval"

const result = await evaluate(
  {
    apiKey: process.env.TRUVYX_API_KEY!,
    scenarioId: "clinical-scheduling-v2",
    complianceMode: true,
  },
  async (scenario) => {
    return await myAgentPipeline.run(scenario.parameters)
  }
)

assertFeasibility(result, { failOnRegulatory: true })
console.log(result.overallScore)
Think of evaluate as the complete round trip: fetch the scenario, run your callback, submit the output, wait for the result, and return a structured record. assertFeasibility turns that record into a release decision by throwing when the threshold or regulatory rule is not met.
Step 4: understand EvalResult
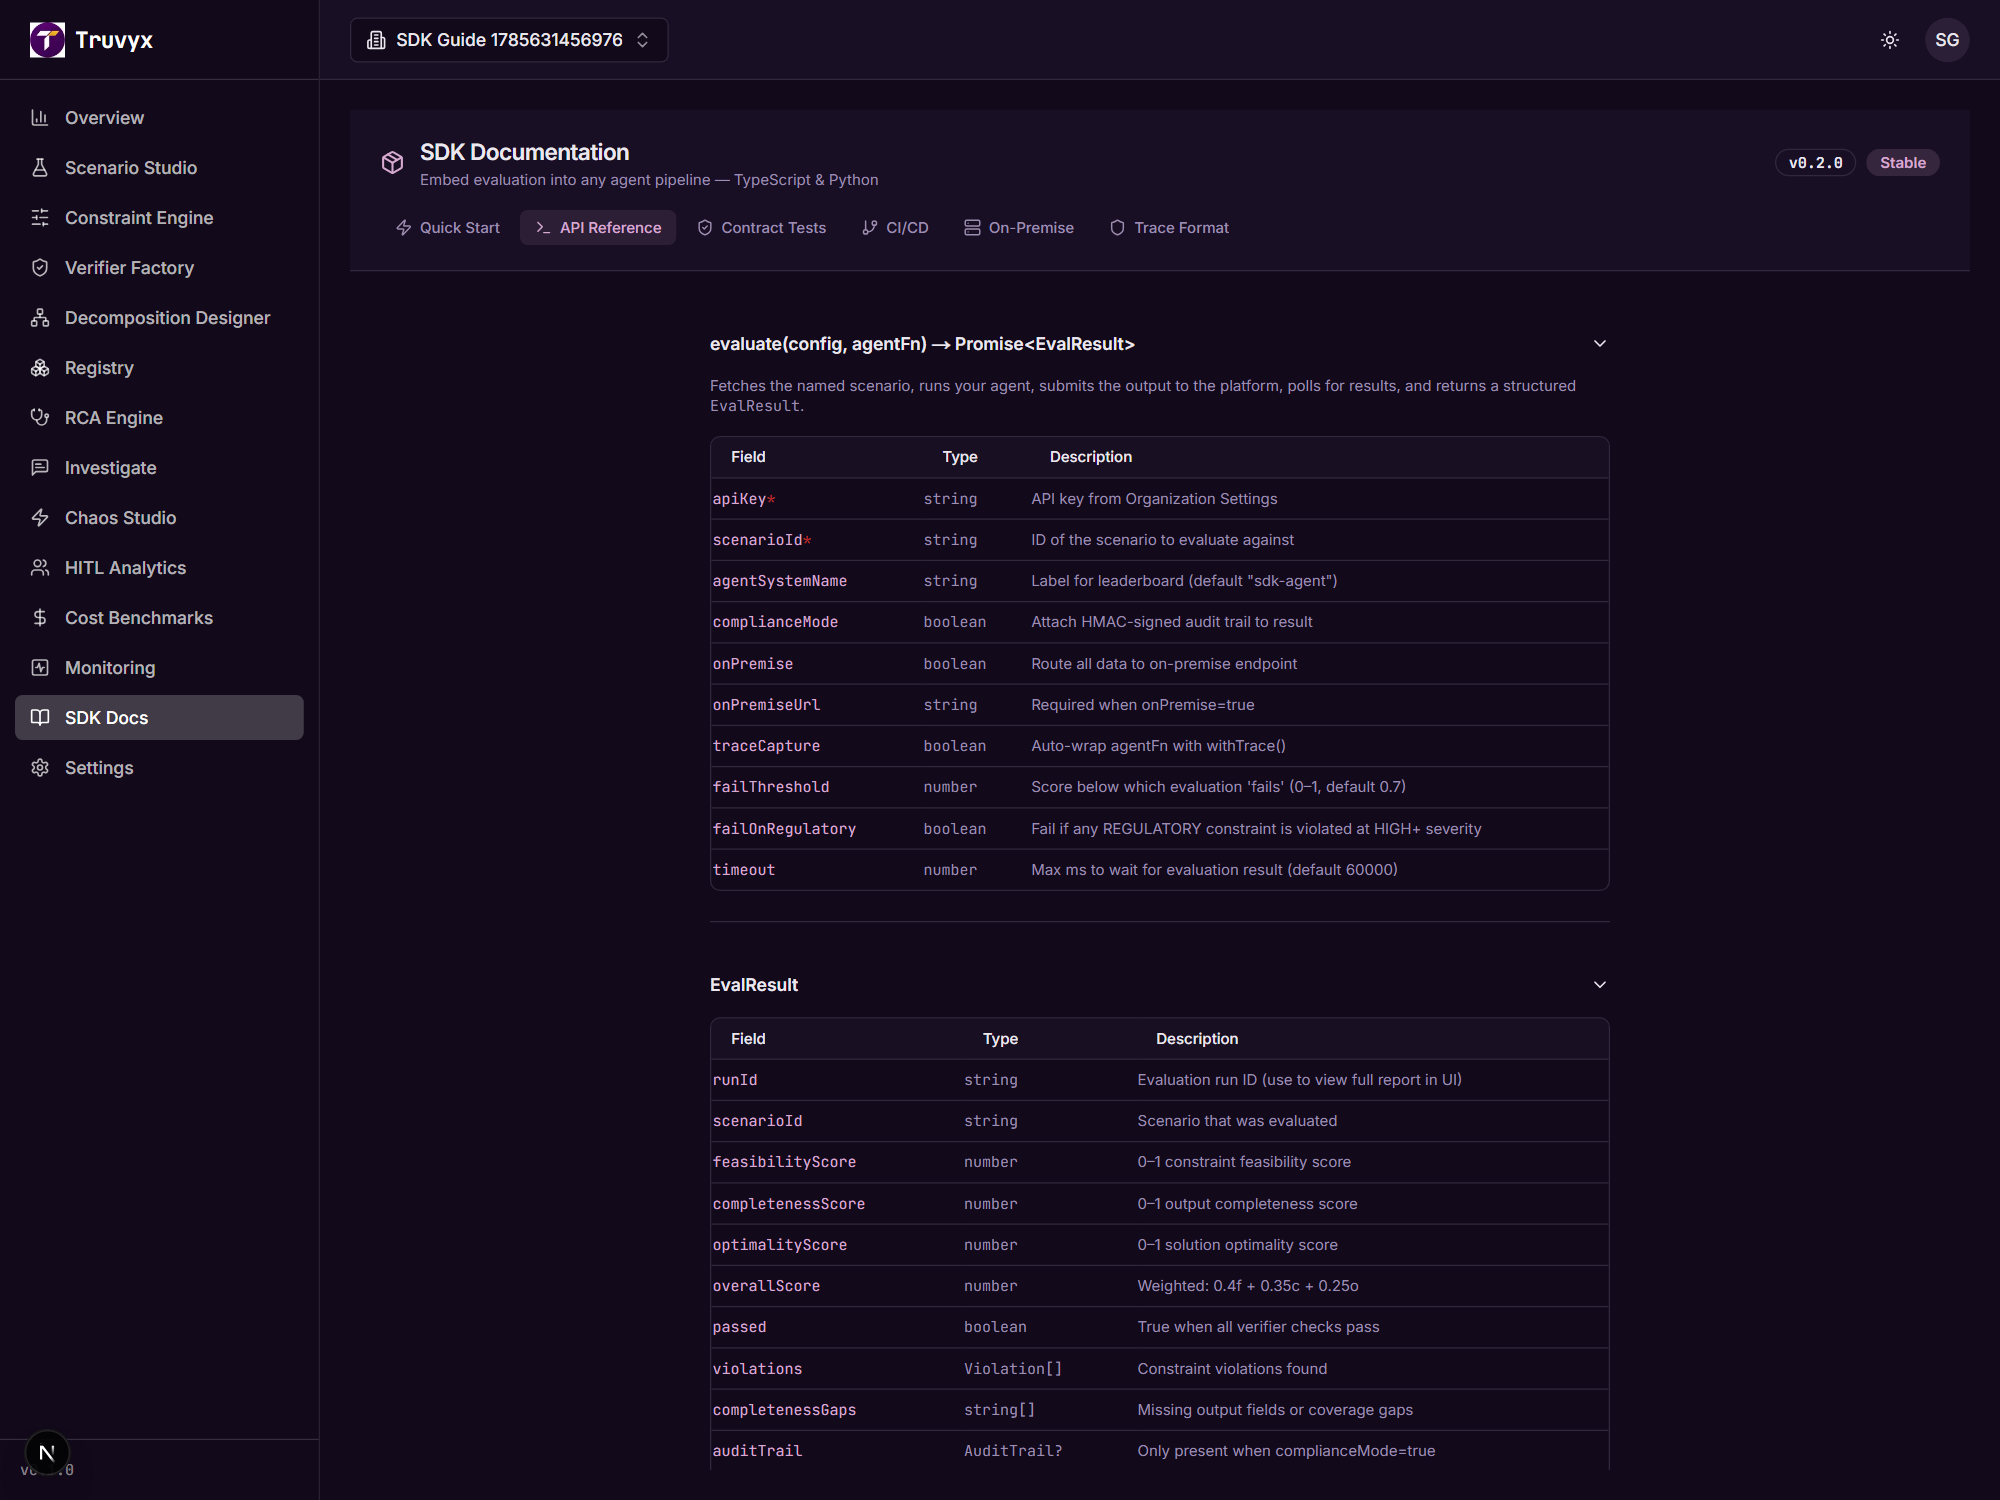
Do not treat the overall score as the only answer. Read the components together:
- feasibilityScore: could the agent obey the constraints?
- completenessScore: did it provide everything the scenario required?
- optimalityScore: was the solution efficient or high quality among valid options?
- violations: which constraints failed and with what severity?
- completenessGaps: which fields or pieces of coverage are missing?
- runId: the link between the SDK result and the full run in Truvyx.
The documented weighted overall score is 0.4 × feasibility + 0.35 × completeness + 0.25 × optimality. A high overall score can still hide a critical regulatory violation, which is why the assertion can separately fail on regulatory findings.
Step 5: use assertFeasibility as a safety gate
Use a threshold that reflects a reviewed baseline, not a number chosen because it makes the build green. For example:
assertFeasibility(result, {
  threshold: 0.85,
  failOnRegulatory: true,
})
If the check fails, the SDK raises an EvaluationError. Your CI job can then stop the deployment while preserving the result for investigation. Link the returned runId to the Runs page and, when needed, open RCA Engine to explain the failure.
Step 6: capture execution traces
Scores tell you that something changed; traces help explain where it changed. In TypeScript, wrap an agent with withTrace. In Python, decorate the function with @trace. Each step records the agent, action, input/output shape, duration, and timestamp. Keep sensitive traces private unless you have deliberately reviewed the sharing policy.
import { evaluate, withTrace } from "@truvyx/eval"

const tracedAgent = withTrace(myAgent, { agentId: "planner" })
const result = await evaluate(
  { apiKey, scenarioId: "...", traceCapture: true },
  tracedAgent,
)
Traces connect SDK evaluation to RCA Engine, where execution paths can be reconstructed into a causal explanation.
Step 7: add contract tests for multi-agent systems
When Agent A feeds Agent B, a change can break the interface even if each agent looks healthy alone. Contract tests infer expected producer-to-consumer fields from run history and classify changes as BREAKING, DEGRADED, or WARNING.
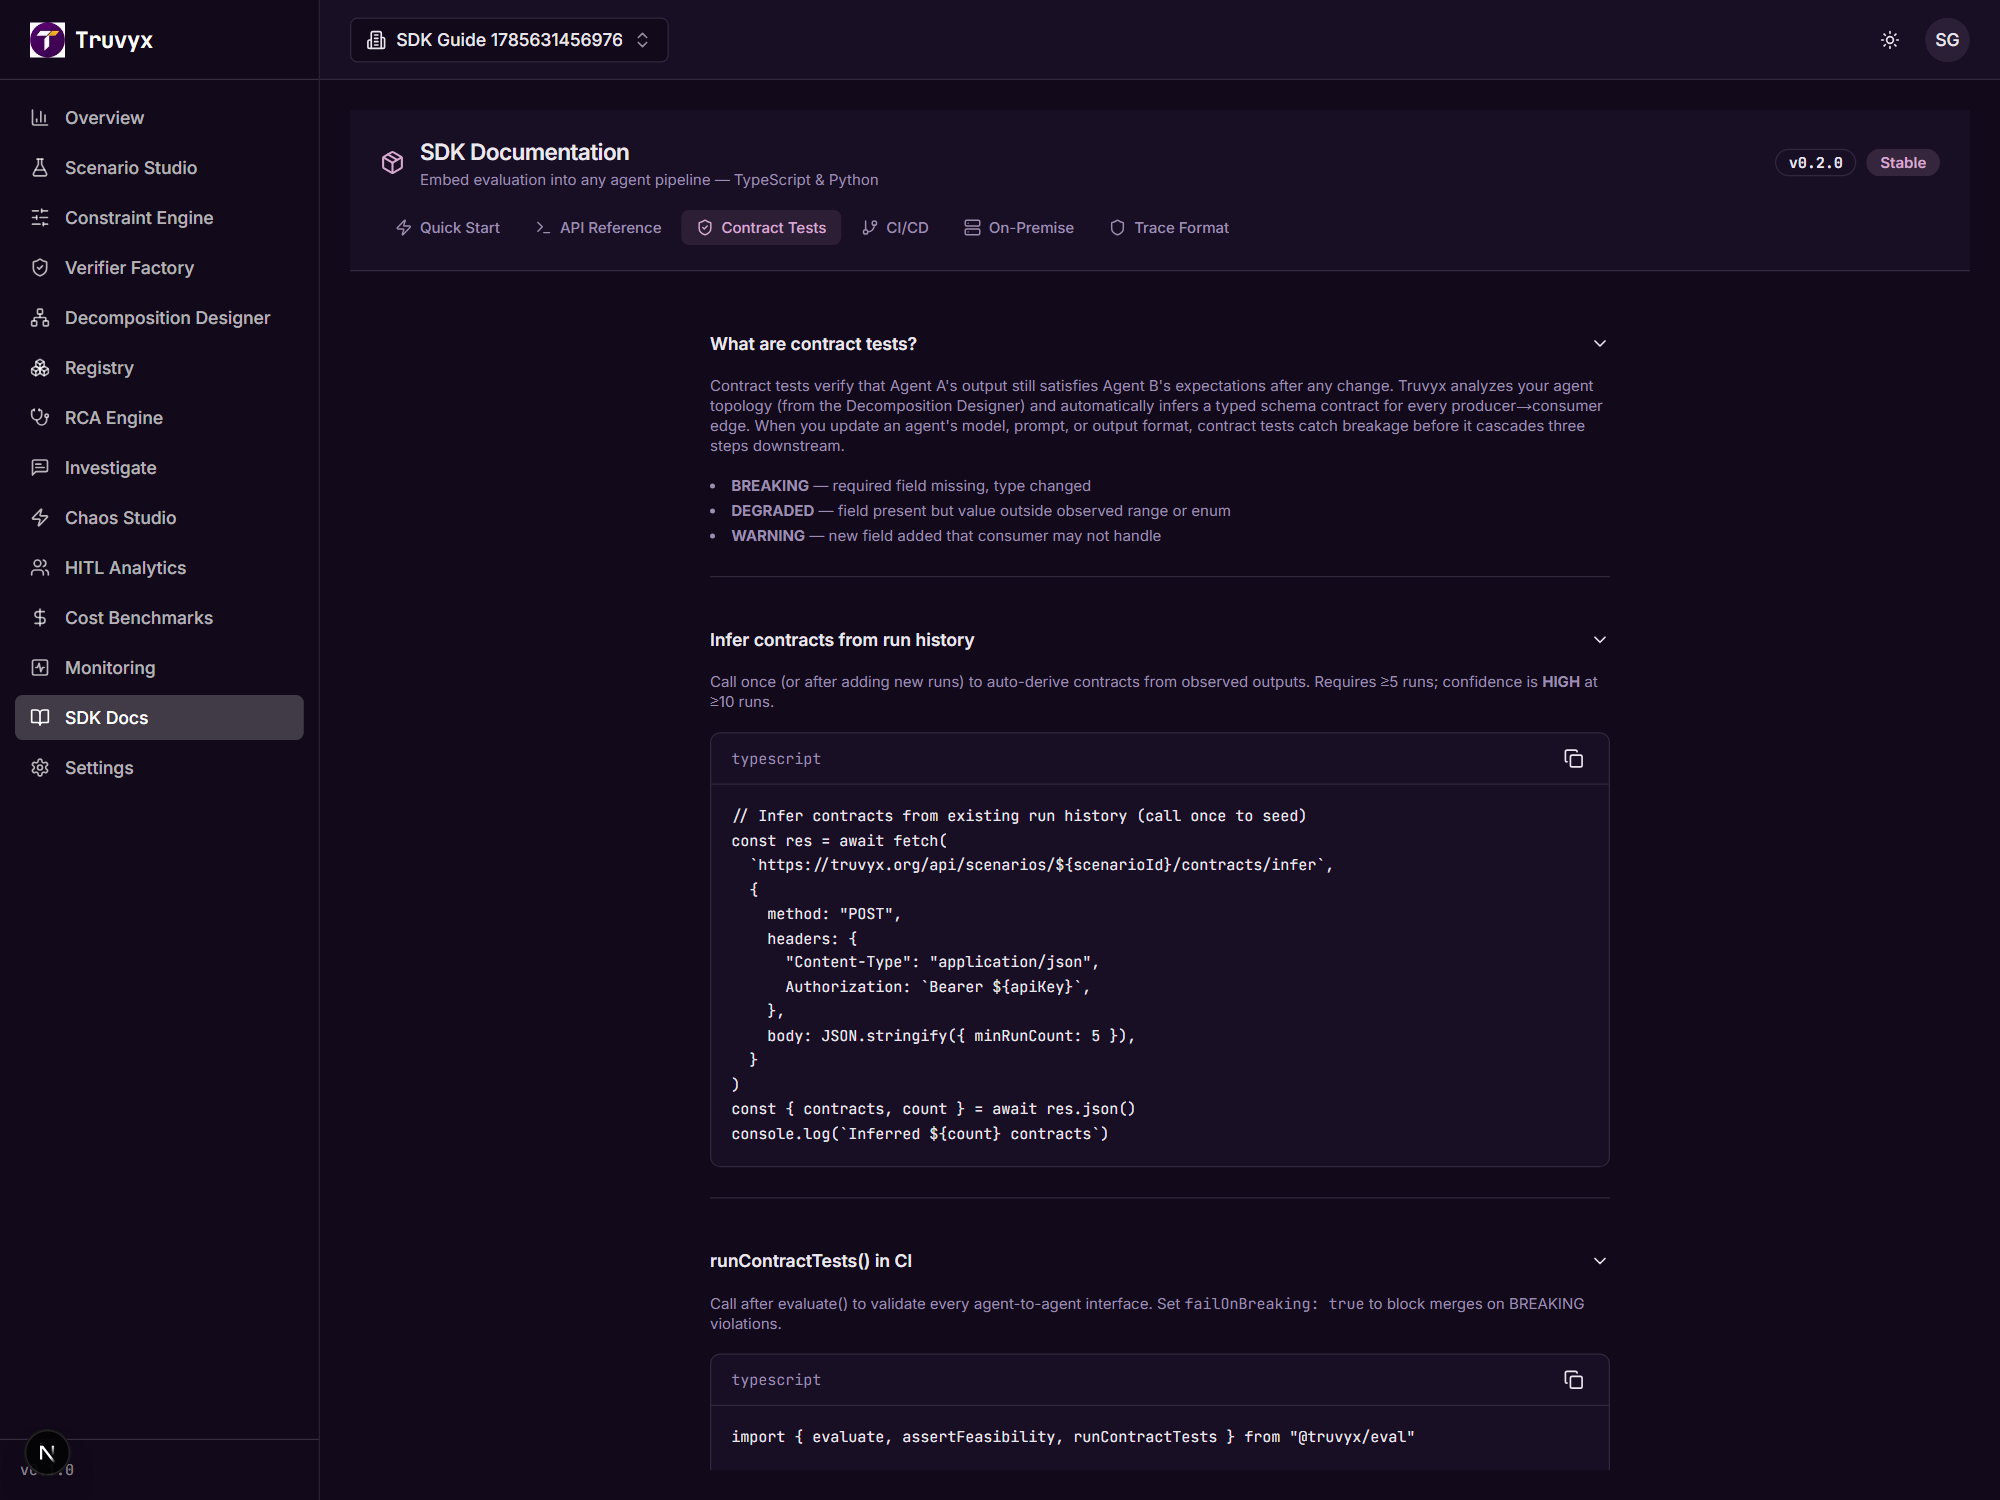
Seed contracts after you have enough representative runs, then run them on every agent update. Set failOnBreaking: true to block a merge when a required field disappears or changes type.
const contractResult = await runContractTests({
  apiKey: process.env.TRUVYX_API_KEY!,
  scenarioId: "scn_abc123",
  triggeredBy: "ci",
  failOnBreaking: true,
  failOnDegraded: false,
  outputReport: "./contract-test-results.json",
})
This connects directly to Decomposition Designer: the designer shows the producer-to-consumer edges whose contracts need attention.
Step 8: put evaluation in CI/CD
Add TRUVYX_API_KEY as a repository secret, install dependencies, run the evaluation script, and upload the JSON report even when the job fails. This gives reviewers evidence instead of only a red or green status.
- name: Run Truvyx Evaluation
  env:
    TRUVYX_API_KEY: ${{ secrets.TRUVYX_API_KEY }}
  run: npm run eval

- uses: actions/upload-artifact@v4
  if: always()
  with:
    name: truvyx-eval-report
    path: truvyx-report.json
Start with pull requests and staging. After your thresholds, scenario suite, and alert response are trusted, promote the gate to production deployment.
Step 9: choose on-premise mode when data must stay inside
On-premise mode routes evaluation data to your own Truvyx host. Set onPremise: true, provide onPremiseUrl, and create the API key in that organisation. Do not copy the development DATABASE_URL, Redis URL, or provider keys from an example into a public deployment; use the secrets and internal service names belonging to your environment.
A safe first SDK rollout
- Run one known scenario locally with a non-production key.
- Inspect component scores, violations, gaps, and the run ID.
- Add an assertion with a reviewed threshold.
- Capture traces only after checking what data they contain.
- Move the command to staging CI and upload reports.
- Add contract tests if the system has multiple agents.
- Connect failures to Runs, RCA Engine, and Monitoring before enabling a production gate.